Learning objectives:
- including our custom objects in the scene
- including a light source
Now that we have everything under control, let’s go back to adding objects to the scene and also make our scene slightly more appealing by adding some natural light sources.
The goal is to visualise brain activity in certain spots on the surface of the brain. For starters, let’s add some spheres and position them.
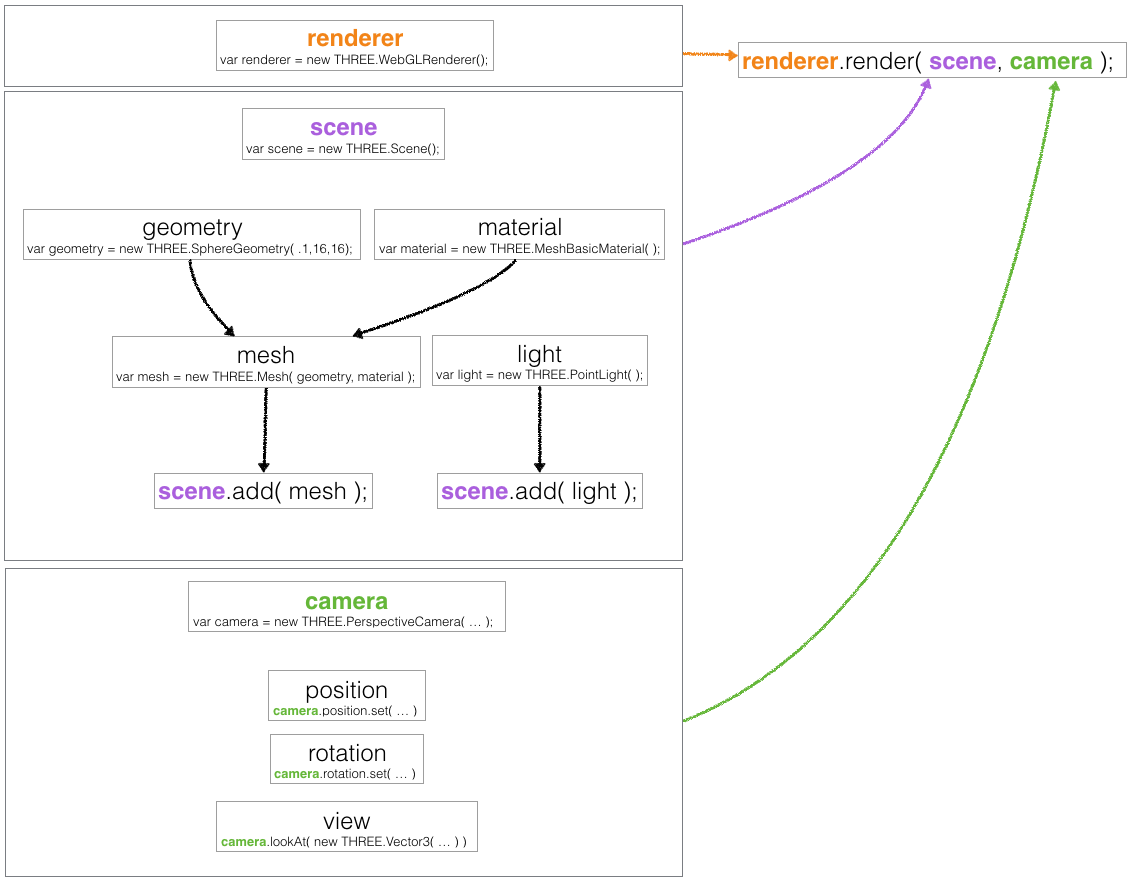
In the docs we can find SphereGeometry, that we can set up in the following way:
var sphereGeometry = new THREE.SphereGeometry(5, 8 ,8);
Just like before, our geometry needs to be coupled with a material to make a mesh that we can then add to the scene.
var sphereMaterial = new THREE.MeshNormalMaterial();
var sphere = new THREE.Mesh(sphereGeometry, sphereMaterial);
scene.add(sphere);
Lastly, we need to call the render function to update what we see on the screen.
renderer.render(scene, camera);
Now let’s change where our bubble sits in the scene.
We do this in the very same way we set the position of the camera:
sphere.position.set(-20, 50 , 80)
Challenge: Adding eyes!
- Play with the 3 sphere parameters. See if you can make the ball look smooth.
- Give the brain 2 smooth, small, white eyes using
MeshBasicMaterial.- Use
MeshBasicMaterialon the brain and give it a colour.- With this being done, it’s time to play with another material. Find the Lambert material in the docs and apply it to all geometries. …what just happened?! Inspect the scene carefully… are our spheres still there?
Time to get our brain back! At the moment, it’s dark in our virtual room. Let’s add some ambient light:
var ambientLight = new THREE.AmbientLight(0x404040, 2); // soft white ambient light
scene.add( ambientLight );
Note:
If you refer back to the diagram from lesson 3, you can see that we need to add the light before rendering the scene, just like we did with the spheres.
Challenge: Natural shading
- Naturally, there are different ways to illuminate your scene. Use THREE.PointLight() to create a point source. Brain and spheres should be back at looking three dimensional!
- Then move it above the brain using the same command we used to move our camera and spheres earlier. You can also play the colours of your two light sources.
Here is what the scene should look like by the end of this lesson:
Next Lesson: Animating things!