Learning objectives:
- Setting up an environment that allows us to view 3D objects using ThreeJS
- Using a scene, a camera, and a renderer
Before we start doing anything visual, we need to set up our main html file (‘index.html’.) We need to link to the ThreeJS library as well as a loading module to read in 3D object files. We’ll also go ahead and include another file straight away - ‘main.js’ - a file that will contain our own code.
Then, we insert a div element that we will use to display our scene in and give it the ID ‘container’
<!DOCTYPE html>
<html>
  <head>
    <title>Playing with ThreeJS</title>
  </head>
  <body>

    <div id='container'> </div>

    <script src="https://cdnjs.cloudflare.com/ajax/libs/three.js/r74/three.min.js"></script>
    <script src="STLLoader.js"></script>
    <script src="main.js"></script>
  </body>
</html>
Now to the more exciting part: ThreeJS! Before we can start displaying things on the screen, there are a few things we need to do: we need to tell our browser where our 3D objects will live and which angle we’re looking at them from. To display any object, we need to do three things:
- set up a scene object using
Scene - set up a camera object using
PerspectiveCamera - set up a rendering object
WebGLRenderer
Let’s go through the dot points one by one:
Scene:
The scene is a 3D space that we set up and that will contain all our 3D objects we create. The function we use to create a scene is THREE.Scene()
Camera:
The camera is our point of view. The function we use to create a camera object is THREE.PerspectiveCamera()
Renderer:
The scene and any objects in it are only visible to us through the camera. And what we see through the camera needs to be drawn in 2 dimensions onto our page. This is the task of the renderer: it’s taking what the camera sees in the scene and draws it in 2D in our browser.
If the camera (position, direction, or aspect ratio) changes or we insert or move objects in the scene, we will have to re-draw this 2D image which means we re-render the page.
The function we use to create the rendering object is THREE.WebGLRenderer()
ThreeJS is programmed in a way that requires us to use the new keyword to create new ThreeJS objects like these three. That’s not the case for all JavaScript libraries and it’s just a design choice the creators made.
In our JavaScript file ‘main.js’, we start setting the scene:
var scene =  new THREE.Scene();
var camera = new THREE.PerspectiveCamera( 90, window.innerWidth / window.innerHeight, .1, 1000 );
var renderer = new THREE.WebGLRenderer();
We have given the camera a few default parameters - don’t worry about them for now, we’ll play with them later.
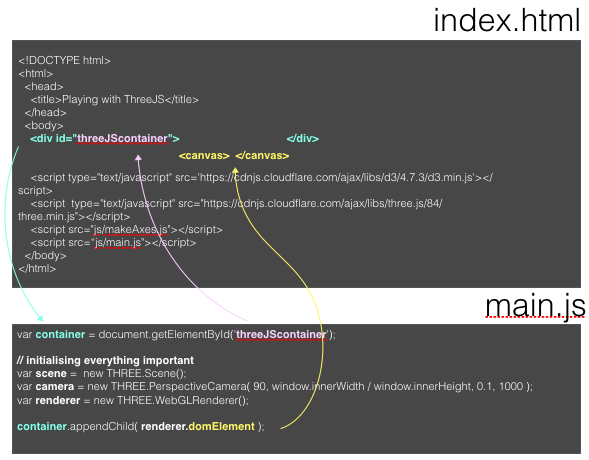
To be able to draw the 2D projection of our 3D objects, the renderer creates its own canvas <canvas></canvas> which we will need to insert into the page, more precisely, inside the <div> container we set up before.
We’re doing this using appendChild(). Each HTML element can have any number of “children” who can have children on their own. Think of the structure like russian dolls (or turducken)… except if they could have siblings. Each child has one parent, the HTML element it’s contained within.
And while we’re at it, we’ll make the canvas as large as the browser window:
var container = document.getElementById('threeJScontainer');

container.appendChild( renderer.domElement );
renderer.setSize( window.innerWidth, window.innerHeight );
Challenge: inspect the scene
To see what these lines of code do to our page, open the page in the browser and inspect the page elements. You should find a <canvas> element inside a <div> element. This canvas element is the ‘domElement’ the renderer attached to our main container. Everything we do from here on will be drawn (=rendered) in this canvas.